Getting the Most from Your Procreate Brushes Stamp Back to School Set
If you have picked up a Procreate Brushes Stamp Back to School set, you are probably excited to start creating doodles, stickers, label designs, or classroom materials. These brush sets are popular for a reason: they save time, add personality to your work, and make it easy to produce themed content without redrawing the same elements over and over. But like any digital tool, how you use them matters a lot. Many people download a set like this and end up frustrated because the results do not match what they expected. That is usually not the fault of the brushes themselves. It comes down to small but important details that are easy to overlook.
Let us walk through some of the most common mistakes people make with Procreate stamp brush sets, and how you can avoid them from the start. Whether you are a teacher preparing worksheets, a small business owner making social media graphics, or a hobbyist working on a back-to-school project, a little extra care will save you time and help you produce work you are proud of.
Not Checking Compatibility Before You Buy
One of the most frequent misunderstandings with any Procreate brush set is thinking it will work on any device. The product description for this set clearly states that it requires the Procreate app for iPad. That might seem obvious, but people sometimes assume they can use the brushes in Photoshop, Illustrator, or other software. That is simply not how these files work. Procreate brush sets are proprietary to the app and will not open in anything else.
Before you purchase, confirm that you have an iPad and that Procreate is installed. Also check that your iPad model supports the version of Procreate you are running. Older iPads may struggle with larger brush files or may not support certain brush properties. Taking thirty seconds to verify compatibility can prevent the disappointment of buying a set you cannot actually use. If you are unsure, look up your iPad model and the current Procreate requirements online. It is a simple step that many skip.
Assuming Brushes Will Work Exactly Like Previews
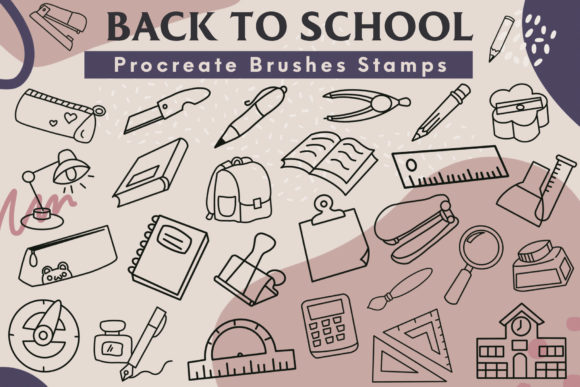
When you see the preview images for the Procreate Brushes Stamp Back to School set, they look polished and perfectly placed. It is easy to assume that every brush will stamp exactly like the example. In reality, your results depend on your brush size, pressure settings, canvas resolution, and the layer you are working on. A stamp that looks clean and crisp on a 300 DPI canvas may appear blurry or pixelated on a low-resolution document.
Another thing people forget is that stamp brushes often include texture and scatter settings. If you tap once, you might get a slightly different result than if you press and hold. The brush is not broken; it is behaving according to its design. Spend a few minutes testing each brush on a blank canvas before you start your actual project. Adjust the size slider and experiment with different pressure levels. That trial run will show you exactly what each stamp can do and help you avoid surprises later.
Overlooking the ZIP File and Import Process
The product you receive is a ZIP file containing the brush set. Some users expect the brushes to appear automatically after download. That does not happen. You need to unzip the file, open it on your iPad, and then import it into Procreate. This is a straightforward process, but it trips people up if they are not familiar with file management on iOS.
After downloading, locate the ZIP file in your Files app. Tap it to extract the contents. You should see a .brushset file. Tap that file, and Procreate should open and import the brushes automatically. If nothing happens, check that Procreate is installed and that you have not accidentally moved the file to a location the app cannot access. If you are still stuck, there are plenty of short video guides showing the exact steps. Do not assume the brushes are faulty just because the import is not immediate. The process is simple once you know it, but it is not automatic.
Ignoring the License Terms
The annotation in the product description is clear: do not share or resell the brushes. Some people think that because they bought the set, they can pass it along to friends or include it in a bundle they sell themselves. That is a misunderstanding of how brush licenses work. When you purchase a brush set, you are buying a license to use the brushes in your own work, not to distribute the brush files themselves.
This matters because violating license terms can get you banned from marketplaces or worse. If you are a small business owner or freelancer, your reputation matters. Respecting the creator's work is not just ethical; it keeps you in good standing with the platforms you rely on. If you want to recommend the set to someone else, send them a link to purchase it themselves. That way everyone stays within the rules.
Using Stamps Directly Without Adjusting Canvas Size
Stamp brushes have a default size that may not match your project. If you are working on a small canvas, a stamp that looks fine at full size might take up too much space. If your canvas is very large, the same stamp might look tiny. This is not a flaw; it is a matter of scaling. Many users make the mistake of thinking the brush size slider is the only control they need. While the slider helps, your canvas resolution and DPI also affect how the stamp appears.
A good habit is to set your canvas size before you import any stamps. If you are creating a poster, use a high-resolution canvas. If you are making stickers for social media, use the dimensions recommended by the platform. Then test your brush at different sizes. You can also use the transform tool after placing a stamp to resize it precisely. That gives you more control than the brush slider alone.
Neglecting Layer Organization
When you start using multiple stamps in one project, layers can become messy quickly. Each stamp you place creates a new mark on the current layer unless you add a new layer first. Beginners often stamp everything on one layer and then realize they cannot move or edit individual elements. That is frustrating, especially if you have already placed several stamps and need to reposition one.
Make it a habit to create a new layer for each stamp or group of stamps. Name your layers so you know which is which. This takes an extra few seconds but saves you from redoing work later. If you are combining stamps with text, keep your text on separate layers. That way you can adjust spacing, color, or alignment without disturbing the stamps. Good layer discipline is one of those habits that separates smooth workflows from frustrating ones.
Forgetting to Save and Back Up Your Work
This one seems basic, but it happens all the time. You spend an hour placing stamps, adjusting sizes, and building a composition, and then something goes wrong. The app crashes, you accidentally delete a layer, or your iPad runs out of battery. Without a recent save, that work is gone. Procreate has an auto-save feature, but it is not perfect. Relying on it completely is risky.
Save your work frequently, and export a copy to your Files app or cloud storage when you reach a milestone. If you are creating something for a client or a deadline, keep multiple versions. The small effort of saving regularly is nothing compared to the frustration of losing hours of work. This is especially true with stamp-based projects where you may have carefully positioned many elements.
Expecting Every Stamp to Match Your Color Palette Perfectly
Stamp brushes often come in a default color, usually black or a neutral tone. Many users assume they can change the color easily by selecting a different foreground color before stamping. That does work, but the result depends on the brush's design. Some stamps are grayscale and will take on whatever color you choose. Others may have built-in shading or texture that does not respond well to simple color changes.
If you want full control over color, consider using the stamp on a separate layer and then applying color adjustments or clipping masks. That way you can change the hue, saturation, or brightness without affecting the stamp's inherent shading. If the stamp looks flat after a color change, experiment with layer blending modes. Multiply mode can add depth, while screen mode can lighten the stamp. A little experimentation goes a long way toward getting the look you want.
Rushing Through the First Few Projects
When you get a new tool, the temptation is to use it in every project right away. That enthusiasm is great, but it can lead to rushed work that does not show the brushes at their best. If you are making a back-to-school worksheet, for example, you might stack stamps onto the page without considering spacing, alignment, or visual balance. The result looks cluttered and unprofessional, and you blame the brushes.
Instead, give yourself time to learn each brush. Use them in simple projects first. Make a single sticker design. Create a thank-you card. Practice arranging stamps in a clean layout. As you get comfortable, you will develop a feel for which brushes work best together and how to compose them effectively. Your later projects will look noticeably better than your first ones. That is normal and expected. The tools are there to support your creativity, not to do the work for you.
Not Checking the File Contents After Download
When you download the ZIP file, it is wise to open it and verify that all 30 brushes are present before you start a project. Sometimes downloads get interrupted, or files become corrupted. If you wait until you are mid-project to discover a missing brush, you lose momentum. Open the file immediately after download, count the brushes, and test a couple to make sure they import correctly. If anything is off, contact the seller right away. Most reputable sellers will help you resolve the issue quickly, but they need to know there is a problem.
This is also a good time to read any included documentation. Some sets come with a text file or PDF that explains brush behavior, recommended settings, or tips. Do not ignore that. The creator often includes valuable information that will save you from guessing later.
Final Thoughts on Getting Value from Your Brush Set
The Procreate Brushes Stamp Back to School set offers a lot of creative potential, but it is not a magic wand. Like any tool, its value depends on how you use it. If you approach it with realistic expectations, a willingness to test and adjust, and respect for the technical requirements, you will get excellent results. If you skip the basics, you will likely end up frustrated.
Take the time to set up your canvas correctly, organize your layers, and learn how each brush behaves. Back up your work, respect the license terms, and give yourself room to experiment. The mistakes people make with these brushes are almost always avoidable once you know what to look for. Now you do. Go ahead and create something you are proud to share.