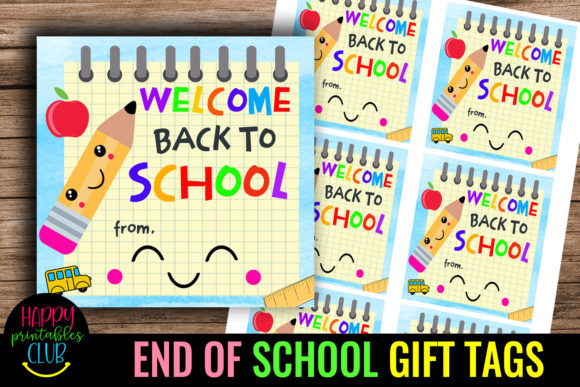
Welcome Back to School- First Day School: How to Use First Day Teacher Gift Tags Like a Pro
The first day of school is a whirlwind of emotions. Excitement, nervousness, and a whole lot of organization run through every classroom and household. Whether you are a parent helping a little one settle in, a teacher preparing a warm welcome, or a small business owner creating back-to-school bundles, those small details make a huge difference. A simple "Welcome Back to School" tag attached to a little treat or supply can break the ice and build immediate goodwill. But there is a right way and a wrong way to approach these digital wonders. Many people grab a cute design, hit print, and end up frustrated with the size, color, or usability. Let’s make sure you avoid those headaches. This guide walks through the practical realities of using "Welcome Back to School- First Day School" digital tags so you can focus on creating those meaningful first-day moments.
The Number One Misunderstanding: Digital vs. Physical
The product you are purchasing is an instant download—a ZIP file containing a PDF, JPEG, and PNG file. It is not a physical sticker or card shipped to your home. This distinction sounds simple, but it trips up many well-intentioned buyers.
The most common mistake is treating the digital files like a finished product. You cannot just buy it and have it appear on your desk. The consequence of this misunderstanding is frustration, wasted time, and potentially scrambling for a last-minute physical gift. A parent might download the file on their phone, not realize it needs to be unzipped, and then wonder why they cannot print it directly.
The better approach is to treat the digital files like a template or a master key. Your job is to unlock their potential through printing or digital application. As soon as you purchase, download the ZIP file to a dedicated folder on your computer labeled "Back to School Tags." Unzip it immediately. Look at what you have: the PDF is perfect for a quick, high-quality print layout; the JPEG is great for quick edits or online sharing; the PNG with its transparent background is your best friend for layering onto other designs. Understanding these roles from the start saves you from a last-minute panic.
Size and Scale: Why 3.5x3.5 Inches Matters
The sticker size is listed as 3.5 X 3.5 inches. This is a standard size for gift tags, small favor labels, and treat toppers. However, knowing the size does not automatically guarantee a perfect print.
One of the most frequent mistakes is printing the image without adjusting the settings, leading to an incorrect size. For example, someone might open the PNG file and print it directly from their browser, which often stretches or shrinks the image to fit the page margins. The result is a tag that is either too small to read or too large to fit on a standard goodie bag. Another common error is trying to scale the PNG up significantly to make a poster, which results in pixelation and a blurry, unprofessional look.
To get the best results, look at the provided PDF first. It is likely formatted perfectly for standard letter-sized paper (8.5x11), ensuring the tags print at the correct 3.5x3.5 size. If you need to use the JPEG or PNG for a specific project, open the image settings on your printer or design software, such as Canva or Photoshop, and manually set the dimensions to exactly 3.5x3.5 inches. If you want a smaller tag for a pencil topper, scale it down proportionally. Just remember, never scale a raster image up significantly beyond 100% as the resolution, ideally 300 DPI for print, will degrade quickly.
A small business owner preparing goodie bags for a "first day of school" promotion can print the PNG tags on sticker paper. By setting the custom print size to 3.5x3.5 inches, they get perfectly aligned stickers that fit neatly on a cellophane bag. A parent, on the other hand, can print the PDF on cardstock and use a 3.5-inch circle punch to cut them out flawlessly. Knowing your output size before you hit print is critical for a polished result.
The Color Conundrum: Screen vs. Print Reality
The product description contains an important warning: colors may appear different on your screen compared to the actual print. This is not a defect; it is a technical reality of how digital screens and printers work.
The mistake many people make is panicking when the printed colors look washed out, darker, or slightly different from the vibrant screen display. They might assume the file is corrupted or their printer is broken. The consequence is wasted ink, wasted paper, and a disappointing final product that feels off-brand or less cheerful.
Screens emit light using the RGB color model, while printers use ink and the CMYK model. The file you download is typically optimized for RGB, which means a home printer will shift the colors slightly. To get the best results, you need to manage expectations and test early. Print a test page on plain paper first. Check your printer settings and select "High Quality" and the appropriate paper type, such as "Photo Paper" or "Cardstock," even if you are just testing on plain paper. This forces the printer to use more ink and better dithering.
If you need true color accuracy for a large batch, such as for a PTA event or a small business launch, take the PNG or JPEG file to a professional print shop like Staples or a local copy center. Ask for a color test print on the exact paper you intend to use. They can calibrate their machines to minimize the difference. For teachers, that bright red apple on the tag should look inviting, not dull. For small business owners, brand consistency matters. Testing early avoids a stack of unusable, poorly colored tags.
Choosing the Right Format for the Right Job
You receive three file types: PDF, JPEG, and PNG. They are not interchangeable for every task. Using the wrong one can create extra work or a lower quality result.
The PDF is your best friend for straightforward printing. It retains the highest quality and typically lays out multiple tags perfectly on one page, making it the most reliable choice for home printers. If you just want to print, cut, and go, the PDF is the only file you need to open.
The PNG file has a transparent background. This is essential if you want to layer the tag onto a digital design, create a sticker sheet in a cutting machine program like Cricut Design Space, or add it to a photo of a gift basket. The transparent background allows it to blend seamlessly without a white box around it.
The JPEG file has a solid white background. It is useful for quick sharing on social media, inserting into a Word document, or if your design software has trouble handling transparent PNG files.
The mistake here is using the JPEG for a professional sticker project, which results in awkward white edges that need to be cut off manually. Alternatively, using the PNG in a basic word processor might cause the transparent background to render as black or checkerboard, leading to confusion. Match the format to the task. For 99% of basic gift-tag printing, the PDF is your superior choice. For advanced crafting or digital marketing, learn how to import and use the PNG properly. This small bit of knowledge prevents a lot of design frustration.
Workflow Advice: Avoiding the Last-Minute Rush
School mornings are inherently chaotic. Trying to produce a polished gift in the middle of that chaos is a recipe for disappointment.
The biggest workflow mistake is buying the download the morning of the first day of school and expecting a perfect print in five minutes. This scenario almost always leads to a problem: the printer is out of ink, there is a paper jam, you discover you need a specific type of cardstock, or you struggle to unzip the files on your phone. The consequence is a rushed, lower-quality result or no tag at all.
A better approach is to plan your workflow like a small project. Give yourself at least three to five days before you need the labels. Here is a practical sequence:
- Buy and Download: Do this early in the week. Save the ZIP file to a dedicated folder on your computer or cloud drive.
- Unzip and Inspect: Open the folder and look at the files. Confirm you have the PDF, JPEG, and PNG. Read any instructions included.
- Test Print: Print one sheet on regular copy paper. Check the size and the colors. Hold it up to your gift to see if the scale works.
- Gather Materials: Purchase good quality cardstock, sticker paper, or matte photo paper. A heavier paper, like 65lb or 100lb cardstock, feels significantly more professional than standard printer paper.
- Final Print: Print on your good paper. Let the ink dry for a few minutes before handling to prevent smudging.
- Cut and Assemble: Use a paper trimmer, sharp scissors, or a circular punch for perfect edges. Attach the tags to your gifts with ribbon, twine, or double-sided tape.
This workflow transforms a last-minute chore into a simple, enjoyable task. A freelance creator preparing fifty welcome kits for a local school can follow this plan, test the PDF on plain paper, adjust their printer settings to "vivid" to match the school colors, and then print the full batch on premium cardstock. The result is a professional-quality set of tags that look cohesive and thought-out.
Small Business and Creator Considerations
For those selling back-to-school products, these tags are a fantastic value-add for packaging. Adding a "Welcome Back" tag to a pencil set or a small treat significantly increases the perceived value of your product. It shows attention to detail that customers appreciate.
One important mistake to avoid is reselling the digital file itself as-is. Most standard licenses for these types of products are for personal use or for use within a single business to enhance physical goods. They do not grant permission to resell the raw digital file to other customers. Always check the terms of use. If you are a digital seller, consider creating a "physical product" listing that includes the printed tag, or use the tag in your marketing images to showcase your brand's style. Using the tag as a promotional tool for your own business is a smart move, but redistributing the designer's work is not.
Making the Most of Your First Day Gesture
The "Welcome Back to School- First Day School" tag is more than just a piece of paper or a digital file. It is a symbol of a fresh start and a thoughtful connection. By understanding the technical nuances, from file formats and color profiles to sizing and workflow, you transform a simple download into a meaningful, polished tool. Whether you are a parent, teacher, or entrepreneur, taking the time to prepare correctly ensures that your first-day gestures are received exactly as intended: with warmth, effort, and a touch of professional charm. Skip the stress, follow these practical steps, and make this back-to-school season your most organized and impressive one yet.